


It’s not often get into the details of “this is how I work.” A lot more of my writing here tends instead towards the “this is how I think.”
And yet I recognize that there are those that are fascinated by process, tools and workflow. That’s been reinforced to me several times over the last couple of weeks, as a new consulting assignment has gotten underway.
As is relatively obvious to most readers of this site, much of what I do as a consultant involves facilitation. And I’ve spent a lot of time evolving, practicing, thinking about, shaping and scaling how I approach facilitation in order to be as effective as possible in the role. Usually, that means that how I facilitate one engagement for one client bears minimal resemblance to how I might have facilitated another engagement for another client. Every organization is different, every culture is different and every problem is different. I adapt my approach to the situation at hand.
At the front of the room, though, is simply me. Well, me and a bunch of tools and resources. While I don’t know what challenges will emerge over the course of a meeting, my inner boy scout wants to be prepared for all eventualities. That’s a pretty tall order, and difficult to accommodate, but I’ve gradually sorted out the essentials that allow me to flexibly respond to whatever might happen in the moment.
That kind of challenge doesn’t happen often, but when it does, it’s awesome to be able to respond. A recent example came up recently. Working through some specific and detailed discussions, one of the executives said “I’m really struggling with this. It would be great if I could have this information presented this way instead.” I was able to look him in the eye, tell him “I totally get that. Tell you what. Let’s take a 10 minute break, and I’ll see what I can do.” eight-and-a-half minutes of data analysis, sleight of hand and a sprint to a printer later, and we were back in business.
Over the years, I’ve learned the resources that I typically need as well as those that I might like to have on the fly. And those additional bits and pieces that I rarely use but still keep on hand, just in case. A big challenge is how to organize and manage all of this. My approach to doing that is what I want to share here.
The vast majority of facilitators have some sort of facilitation kit. Often, that’s just a handful of markers, a stack of post-it notes and a box of Sharpies. And that will get you through a surprising number of meetings and challenges. It’s certainly where I started. I pressed an old briefcase into service to hold everything initially, which worked fine for a surprising length of time. Over the years, though, what I wanted to have on hand grew, while the bag remained stubbornly the same size. Bursting at the seams, mind you. But ultimately fixed in terms of its capacity.
That led to a search for a different solution. And it was a search that lasted an extended period of time. Despite not being a fan of knapsacks—they look horrible with a suit—I nonetheless went there for a while. I tried plastic storage boxes (no handles). Plastic file boxes (handle, but no organizing ability). Another briefcase (still too small).
And then I found it. The storage solution that has, more than once, prompted the statement: “Whoa! That’s seriously hard core!” Followed very quickly by, “Where did you get it?”
My hard core solution? A plastic toolbox. Specifically, a DeWalt plastic toolbox. From Home Depot. A serendipitous find that I came across one day while searching for something completely different (as one does).

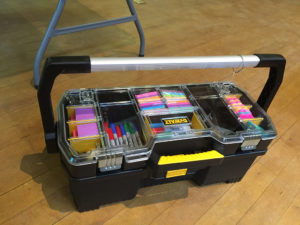
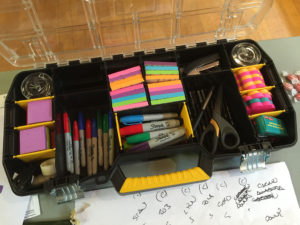
What I absolutely love about using this case for a facilitation kit is that—even though it was designed for tools—it accommodates a surprisingly large amount of stuff, and it does so incredibly well. It comes in two pieces: an upper organizer, and a lower tote. Between the two sections, pretty much everything I need is close to hand.
The organizer is partitioned (and is the perfect size for holding 3″ x 3″ Post-It notes) and comes with a lid that perfectly seals each compartment (so paperclips don’t wind up everywhere; they are seemingly the facilitation equivalent of socks getting lost in the dryer). The partitions are fully adjustable, meaning you can create whatever sized compartments you want. It’s a great way of storing pens, markers, smaller Post-It notes, binder clips, paper clips and other bits of ephemera.
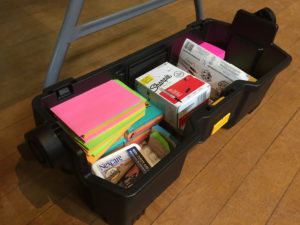
The lower tote is one big open space. Organization is helped keeping items in boxes or creating temporary partitions. I tend to use this for larger Post-It notes. It is also is where I keep backup supplies: still-wrapped stacks of Post-Its and boxes of yet-to-be-used Sharpies. Stack the upper organizer on top of the lower tote, and I’ve got all of my supplies in one convenient carrier with an over-sized, comfortable handle.
While markers, Post-It notes and the like are one part of the facilitation puzzle, what to actually work on is another. For years, I was a fan of the giant Post-It flip chart pads for their flexibility. They are bright white (even the recycled ones) and have an awesome weight to them (unlike newsprint, which delights in finding new and interesting ways to tear apart). They work on a normal flip chart stand. Or you can stick them to the wall. And they have enough adhesion that they put up with relocation multiple times. The only challenge is that they are ridiculously, unconscionably expensive. These days, a 30-sheet pad runs you about 60 bucks.
At the same time, being confined to a flip chart means you essentially have a limited canvas to work with: two feet wide, and two-and-a-half feet tall. I’ve tried to be more visual in how I facilitate, and often want something two, three or even four times that size. Yes, you can tape a bunch of flip-chart sheets together, but it’s neither optimal nor cost-effective to do so.
The solution I landed on about three years ago is a much more adaptable and scalable a solution: roll paper. It’s available in multiple colours (I’m boring, and tend to use white). It’s about three feet wide. And you get to choose how long a sheet you want, every single time. A single roll runs 1,000 feet in length. It’s not cheap to buy (a single roll costs about $300) but it lasts forever. I finally got to the end of my first roll this summer.
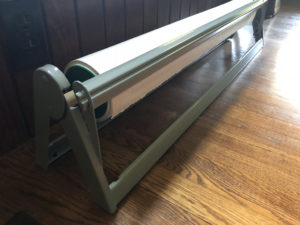
What I love about this is that as a facilitator, I have maximum flexibility. Based on what I’m doing (helping to illustrate a process, supporting a brainstorm or working through the cause-and-effect of solving a problem) I can document everything I want on a single piece of paper. I can adjust the size of paper that I work with to the wallspace of the room I’m facilitating in (and that’s no small consideration, trust me). And at the end of the day, I can roll up everything in one nice, tight bundle without worrying about sheets sticking to each other (or trailing a shower of Post-It notes behind me, which is also no small consideration).
Carrying around a roll of paper is a bit more of a challenge. Selecting and cutting the paper can be a challenge too, unless you invest in a paper cutter (added bonus: you can get rolls of Christmas wrapping paper that work with the same cutter). Both together give me what I need to on demand rip off another sheet, tape it to the wall and carry on with whatever we’re doing.
The solution that I’ve landed on might seem unwieldy to some. For me, it has proved to be absolutely ideal. In any given meeting, I have all of the tools and resources at hand to meet pretty much any challenge I might face. I can prepare in advance (I’ll often pre-build worksheets beforehand, and simply have to tape them up when I get into the meeting room). And I can pack up in a moment. It’s taken me a while to get here, and what’s in my facilitation kit still evolves and adapts, but the core has now lasted the test of nearly four years of heavy and intensive use. It’s still going strong.
What’s in my facilitation kit:
Upper Organizer
– Sharpies (fine, in black and multiple colours)
– flip chart markers
– pens
– binder clips (two sizes)
– paper clips
– scissors
– scotch tape (two rolls)
– 3″ x 3″ Post-It notes (usually about 20 pads, in multiple colours)
– shaped Post-It notes (usually about 10 pads, and I love the ones that look like cartoon dialog boxes)
– 1.5″ x 2″ Post-It notes (usually about 20 pads, in multiple colours)
– a stapler and staples
– USB charging cables (one iPhone and one micro-USB; do not discount the gratitude that will be expressed by meeting participants with dying phones)
Bottom Tote
– 3″ x 5″ Post-It notes (20-30 pads at any given time, usually in yellow; I go through these more quickly than anything else)
– 3″ x 5″ Post-It notes (another 10-15 pads, in multiple colours)
– 4″ x 4″ Post-It notes (12-15 pads, multiple colours)
– 4″ x 6″ Post-It notes (6-8 pads, multiple colours)
– 2-3 packages of multi-coloured 1/4″ dots (12 x 16 dots per sheet) – I almost never use these, but they’re there
– backup flip chart markers (12-16 on any given day)
– backup Sharpies (fine, in black; I buy these in boxes of 36)
– masking tape (two rolls)
– a first aid kit (yup, I really did used to be a boy scout; never used, but on hand if required)